Simple OpenCV Program-Displaying an Image from File
Open Microsoft Visual Studio and create a new win32 console application. Then write the following program. If you have not install and configure OpenCV yet, please refer to Installing & Configuring with Visual Studio.
///////////////////////////////////////////////////////////////////////////////////////
#include "stdafx.h"
#include <cv.h>
#include <highgui.h>
int main()
{
IplImage* img = cvLoadImage("C:/MyPic.jpg");
cvNamedWindow("MyWindow");
cvShowImage("MyWindow", img);
cvWaitKey(0);
cvDestroyWindow("MyWindow");
cvReleaseImage(&img);
return 0;
}
///////////////////////////////////////////////////////////////////////////////////////
Before you run this program, put any image(MyPic.jpg) in C: drive.
You can download this visual c++ project from here. (The downloaded file is a compressed .rar folder. So, you have to extract it using Winrar or other suitable software)
 |
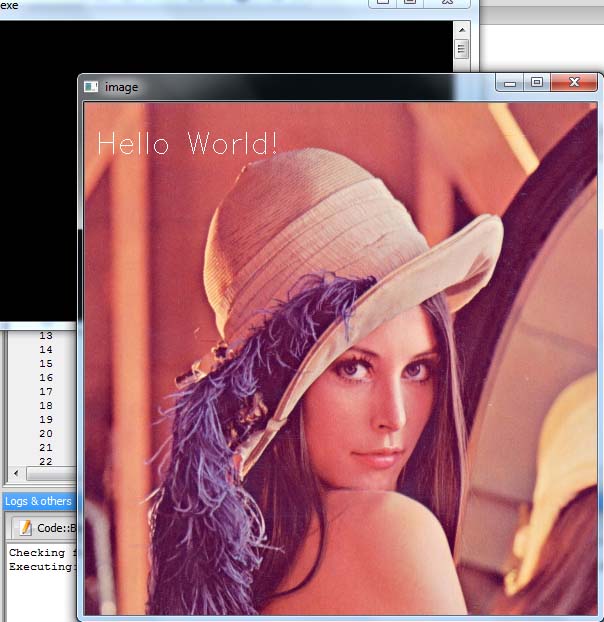
| Result of above OpenCV Application |
Explanation
- #include "stdafx.h"
- #include <cv.h>
- #include <highgui.h>
These 3 lines are pre-processor directives to include some header files for your application. In almost every program you have to insert these 3 line at the top of your program.
- IplImage* img = cvLoadImage("C:/MyPic.jpg");
IplImage is a data structure to store images in the memory.
cvLoadImage(...) is a function which loads an image from the location "C:/MyPic.jpg". Supported image formats of cvLoadImage function are BMP, DIB, JPEG, JPG, JPE, PNG, PBM, PGM, PPM, SR, RAS, TIFF and TIF.
By default, the loaded image is forced to be a 3-channel color image. This default can be modified by using a flag variable inside the cvLoadImage function. Then
IplImage* img = cvLoadImage("C:/MyPic.jpg" , flag);

if  flag: >0 the loaded image is forced to be a 3 channel color image
           =0 the loaded image is forced to be a 1 channel grayscale image
           <0 the loaded image is loaded with number of channels in the file
- cvNamedWindow("MyWindow");
cvNamedWindow(...) function creates a window with the title of 'MyWindow'
- cvShowImage("MyWindow", img);
cvShowImage(..) function shows the image pointed by 'img' variable on the 'MyWindow' window.
cvWaitKey(0) function wait for key press infinitely. If any key is pressed, this function returns the ASCII value of the key and your program will go to the next line.
- cvDestroyWindow("MyWindow");
This function destroy the opened window, with the title of "MyWindow"
This function releases the memory allocated for the image , pointed by 'img' variable. After releasing the image, you cannot access the image, 'MyPic.jpg'. But you can use the variable 'img', for any other thing. If you create something, make sure you release it before terminating the program. This is probably the very first thing you should check when fixing memory leakage problems with OpenCV.
Summary
When running this program, the image of 'MyPic.jpg' is created in the memory and its memory address is loaded into the variable 'img'. Then a window named 'MyWindow' is opened. After that the image, pointed by 'img' variable is loaded to the window, 'MyWindow'. The window, 'MyWindow' with the image, 'MyPic.jpg' will be shown until any key is pressed.
Simple OpenCV Program-Creating a Blank Image
This program is also very much similar to the previous applictoion.
///////////////////////////////////////////////////////////////////////////////////////
#include "stdafx.h"
#include <cv.h>
#include <highgui.h>
int main(){
IplImage* img = cvCreateImage(cvSize(800,500),IPL_DEPTH_8U,1);
cvZero(img);
cvNamedWindow("MyWindow");
cvShowImage("MyWindow", img);
cvWaitKey(0);
cvDestroyWindow("MyWindow");
cvReleaseImage(&img);
return 0;
}
///////////////////////////////////////////////////////////////////////////////////////
You can download this visual c++ project from here. (The downloaded file is a compressed .rar folder. So, you have to extract it using Winrar or other suitable software)
 |
| Result of above OpenCV Application |
New functions which are not found earlier are explained here
- cvCreateImage(cvSize(800,500),IPL_DEPTH_8U,1);
This function create a 8 bit depth unsigned single-channel image which has a hight of 800 pixels and width of 500 pixels.
The first argument, cvSize(800,500) defines the height and width of the image.
The 2nd argument, IPL_DEPTH_8U defines the bit_depth of the image. Here bit_depth is unsigned 8 bits. Here 'U'is stands for 'unsigned'. For more clarification, visit OpenCV Basics.
The 3rd argument defines the number of channels. Here it is single channel.
This function assigns zero to all pixel values of the image which is pointed by the 'img variable.
All other lines are same as the previous application.
Summary
In this application, it is created an image and assigned zero to all pixel values. Therefore we can see a black image as the result of the application.
Simple OpenCV Program-Playing a Video From a File
///////////////////////////////////////////////////////////////////////////////////////
#include "stdafx.h"
#include <cv.h>
#include <highgui.h>
int main()
{
//load the video file to the memory
CvCapture *capture = cvCaptureFromAVI("C:/Wildlife.avi");
if( !capture ) return 1;
//obtain the frames per seconds of that video
int fps = ( int )cvGetCaptureProperty( capture, CV_CAP_PROP_FPS );
//create a window with the title "Video"
cvNamedWindow("Video");
while(true) {
//grab and retrieve each frames of the video sequencially
IplImage* frame = cvQueryFrame( capture );
if( !frame ) break;
//show the retrieved frame in the "Video" window
cvShowImage( "Video", frame );
int c;
if(fps!=0){
//wait for 1000/fps milliseconds
c = cvWaitKey(1000/fps);
}else{
//wait for 40 milliseconds
c = cvWaitKey(40);
}
//exit the loop if user press "Esc" key (ASCII value of "Esc" is 27)
if((char)c==27 ) break;
}
//destroy the opened window
cvDestroyWindow("Video");
//release memory
cvReleaseCapture( &capture );
return 0;
}
///////////////////////////////////////////////////////////////////////////////////////
You can download this visual c++ project from here. (The downloaded file is a compressed .rar folder. So, you have to extract it using Winrar or other suitable software)
New functions which are not found earlier are explained here
- cvCaptureFromAVI("C:/Wildlife.avi");
The function allocates and initializes the CvCapture structure for reading the video stream from the specified AVI file, "C:/Wildlife.avi" (Other video formats also can be used, but they are not optimized e.g.- wmv,dat,mpg).
- cvGetCaptureProperty( capture, CV_CAP_PROP_FPS );
Returns the frames per second of the captured video.
If this function fails to get frames per second, it will return zero.
For the first argument, it should be given a video capturing structure.
For the 2nd argument, there are few options.
They are
- CV_CAP_PROP_FRAME_WIDTH - gives the width of frames in the video steam
- CV_CAP_PROP_FRAME_HEIGHT - gives the height of frames in the video stream
- CV_CAP_PROP_FRAME_COUNT - gives the number of frames in the video stream
- CV_CAP_PROP_POS_MSEC - gives the current position in miliseconds in the running video stream
- CV_CAP_PROP_POS_FRAMES - gives the 0-based index of the frame to be captured next
This method can be used only for capturing from file. It cannot be used for capturing from cameras.
The function grabs the next frame from the captured video and returns the pointer. The returned image should not be released by the user.
The function waits for 1000/fps milliseconds. If a key was pressed before the specified time, it returns the ASCII value of the pressed key and the program will go to the next line. If any key is not pressed, the function returns -1, after waiting for 1000/fps milliseconds.
If cvGetCaptureProperty( capture, CV_CAP_PROP_FPS ) function returns zero, cvWaitKey(40) statement will execute.
- cvReleaseCapture( &capture );
The function releases the CvCapture structure allocated by cvCaptureFromAVI function.
Important Note:
User should never release images, returned by cvQueryFrame function because it will cause a run time error.
Summary
At first, this program captures a video from a file. Then program enters into a infinite loop. In that loop, it grabs frames from the captured video sequentially, shows in a window and wait for 1000/fps milliseconds.
Using cvWaitKey function is very important because cvShowImage function need time to show the image and cvWaitkey will give that necessary time. And waiting 1000/fps milliseconds will make sure the frame rate of output video is same as the original frame rate.
Simple OpenCV Program-Playing a Video From a Webcam or Camera
The only difference of the following program from the above program is the first line after the main function.
///////////////////////////////////////////////////////////////////////////////////////
#include "stdafx.h"
#include <cv.h>
#include <highgui.h>
int main()
{
//initialize and allocate memory to load the video stream from camera
CvCapture *capture = cvCaptureFromCAM(0);
if( !capture ) return 1;
//create a window with the title "Video"
cvNamedWindow("Video");
while(true) {
//grab and retrieve each frames of the video sequentially
IplImage* frame = cvQueryFrame( capture );
if( !frame ) break;
//show the retrieved frame in the "Video" window
cvShowImage( "Video", frame );
//wait for 40 milliseconds
int c = cvWaitKey(40);
//exit the loop if user press "Esc" key (ASCII value of "Esc" is 27)
if((char)c==27 ) break;
}
//destroy the opened window
cvDestroyWindow("Video");
//release memory
cvReleaseCapture( &capture );
return 0;
}
///////////////////////////////////////////////////////////////////////////////////////
You can download this visual c++ project from here. (The downloaded file is a compressed .rar folder. So, you have to extract it using Winrar or other suitable software)
New functions which are not found earlier are explained here
The function allocates and initialized the CvCapture structure for reading a video stream from the camera. Here the '0' means the index of the camera to be used. You can use 1,2,3.. instead of 0, if your computer is attached to more than 1 camera. If there is only one camera or it does not matter what camera to use, -1 can be passed as the index.
cvGetCaptureProperty( capture, CV_CAP_PROP_FPS ) cannot be used for capturing from cameras. Therefore we cannot obtain the frame rate of video stream. Therefore we have to put a custom value for the parameter ofcvWaitKey function. You can use any value more than 20 for that parameter. But you must try different values for that parameter and see the difference.


No comments:
Post a Comment